Detailer's Domain The Source for All Your Car Care Needs

Related Articles


Paint thickness gages have come a long way in the past few years. Gone are the pen-like devices that you would lay against the paint surface and raise up while watching a shaft and trying to guess the number where it left the surface. Today’s paint gages are small, electronic, extremely accurate, and some can measure in a couple of different ways on a couple of different substrates

What do the numbers mean?
Before we talk about any individual paint gage, a detailer must understand what the numbers mean and what the unit is actually measuring. Without understanding the numbers, the gage itself no matter how fancy or expensive, will not really help you.
The paint gage will measure the total film thickness on the surface. That means it’s measuring the E-coat, primer surfacer, base coat and the clear coat combined. As detailers, we only will buff the clear coat and are only interested in the clear coat thickness, but unfortunately, the paint thickness gage will not read clear coat only. So we must first know a couple of things. We must know what the average film thickness of the entire paint surface is on most vehicles, and we must know what the average clear coat thickness is.
Film thickness is measured in 2 ways. First, and the more common and standard term which is called MILS. A mil is a standard unit of measure and equals 1/1000 of an inch. A typical factory paint job on most of today’s cars will generally measure between 4.0 mils to about 6.0 mils. The clear coat will measure generally between 1.5 to 2.2 mils thick on a newer factory paint job
The other way to measure a paint surface is in MICRONS. A micron is a metric unit of measure that equals one millionth of a meter, or 1/1000 of a millimeter. In comparing a micron to a mil, a micron is much smaller. There are 25.4 millimeters in an inch and a micron is 1/1000 of a millimeter.
I use the micron measurement because it’s so much smaller. I always want to know where I am at all times in terms of paint removal. If I need to be aggressive on a paint surface such as wet sanding, micron readings will constantly change as you sand, where sometimes a mil reading will not change all that much while you are sanding
In real terms
The simplest way to show how thick (or actually thin) a paint surface is, will be to show you a cigarette wrapper.
We have all seen them and some people will have one with them, so it’s easy to demonstrate. In my classes, I explain all these numbers, but it never hits home until I show, and measure the cigarette wrapper. One half of a cigarette wrapper will generally measure about 24-27 microns. Both sides of the wrapper will generally measure about 50 microns! This is the entire thickness of the clear coat that is on most of today’s vehicles. That’s it! And we obviously can’t remove all of that in a paint correction procedure or we would be into the basecoat or worse. At that point the entire panel would need total refinishing.
Don’t be scared, yet
Fortunately most of the normal buffing and polishing that we do is not that aggressive. A simple polish or wax job will not really remove any film thickness. You are simply really burnishing and polishing the clear coat to bring out its beauty. Even in light correction or compounding situations, you are only removing maybe 1 or 2 microns. In heavy compound procedures, maybe 3 microns of film removal. And since a car is probably not going to be corrected like that every time, the chances of buffing all the paint off the car (unless mistakes are made) are relatively slim.
So, why all the talk about paint thickness gages? Why do we need one of these tools? Why spend the money?
Let’s look at safety first. The safety of the clear coat! Of course incorrect buffing techniques and over aggressive products and pads will take clear coat off rather quickly. That is not really why we need a tool like this. We need a paint thickness gage for wet sanding. If you are going to get more into heavy correction such as wet sanding, you will be quickly removing clear coat, and we need to keep track of how much is being removed and we need to be accurate
How far can we go?
As you will see with the cigarette wrapper, you can’t take all of it away (even though it would seem rather easy to do). But how much is acceptable? Can we take 50% off, 60%, 70%? You need to know how much removal is safe long before you get involved with an aggressive procedure such as wet sanding. The percentages just mentioned are way too high, so let’s see what can be done
Most car manufacturers will only allow roughly 25% of the total clear coat thickness removed without long term durability problems being an issue. That means that if you started off with 50 microns of clear coat, you would only be able to remove 25% or 12.5 microns without voiding the paint warranty and possibly having problems in that repaired area down the road. Again in a buffing situation, that will probably never even come close. However in a wet sanding situation, you can remove 12.5 microns very quickly.
Sanding paint problems
If the paint surface needs wet sanding to correct the problem, it probably has a nasty issue like a deep scratch, or etching, or some kind of blemish below and into the clear coat. You know normal buffing and even compounding will not even come close to getting it out or improving the problem, so wet sanding needs to be employed.
Without a paint gage informing you of how much clear coat you are removing, you are walking a tightrope. Removing too much clear coat and possibly sanding through into the base coat or primer can happen extremely quickly. You need to know where you are at all times. Knowing approximately how much clear coat was on the vehicle is one variable that needs to be known and knowing how much can be removed is the other variable.
However, without the paint gage, these numbers mean nothing. This is why many mistakes are made during wet sanding, and also why detailers are deathly afraid to wet sand because of what can happen.
A typical repair and procedure
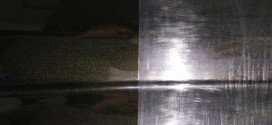
Deep scratches are what you will see most of the time that will give the car a poor look. Customers will request these scratches be taken care of. A deep scratch is unsightly and probably costly to the customer. He knows that going to the body shop; they will be repainting at least the problem panel. The correct way to repair and refinish a clear coated paint surface is to sand out the problem area, mist in the base coat for a color match, and re-clear the entire panel. If the scratch is near an adjacent panel, then the adjacent panel may need to be refinished for color matching as well. Repairs like this can run hundreds of dollars in a body shop.
So wet sanding the scratch is a win-win situation for both parties. The detailer can make a good amount of money in a short amount of time, and the customer can get a scratch repaired very well, save money, and keep the car out of the body shop.
But how do we use the paint gage? You need the paint gage to get your baseline readings. If you sand without the gage, you could be in big trouble very quickly. However, with the gage, the readings will always be alerting you how far you can go and when you need to stop sanding. I generally take a few readings across the scratch before I start to sand it.
Real life scratch repairs
I mentioned that most car manufacturers only want 25% of the clear coat removed. This equates to about 10-13 microns. While this is considerably more than you would ever remove in buffing, it’s really not all that much in trying to repair a deep scratch via wet sanding. Deep scratches need to be “shaved” down, almost like what a Zamboni machine does to an ice surface. This is the only way to repair clear coat. With a harsh scratch, the penetration may be very deep. Remember the cigarette wrapper and how easy it would be to slice it or cut it. This is the same way the paint is generally scratched. Many times the penetration is deeper than 25% or a of the way into the clear coat. I sometimes have to sand deeper than what a car manufacturer would recommend to repair a scratch to a customer’s satisfaction. This means I usually have to take off more than the 10-13 microns of clear coat. I will sometimes go as deep as 20-23 microns.
Without a paint thickness gage, and without being able to be so precise, I would not have the confidence to do this. I also would not be able to sufficiently repair the scratch. I track the clear coat removal from the beginning and I do that by keeping track of the paint readings. If I measure the paint thickness before I begin, I can do this.
For example, I may get a reading before I begin of 125 microns of total film thickness. This obviously is the total amount of all the layers of the paint However; we know that the maximum amount of clear coat will be no more than 50 microns. So, in a real life repair situation, I determine that I will remove no more than 20-23 microns (again a real life repair) or about 40% of the clear coat. You need the customer to be satisfied with the repair, so keep in mind that 10-13 microns removed or 25% is sometimes wishful thinking
Knowing our original measurement is 125 microns, and knowing that I am willing to remove no more than 23 microns of clear coat will leave me with a final reading when the job is completed of no less than 102 microns. This is how we can use the gage effectively and keep track of the progress throughout the entire repair.
The numbers will tell you when to move on. If you start with an aggressive grade of paper like 1000 grit or 1200 grit, you will not be able to remove the entire 20 microns with that piece of paper. You need to back down to 2000 paper to finish it off, so at some point the numbers, NOT the repair itself will tell you that you need to stop sanding. Sanding through the clear coat can happen very quickly, so knowing where you stand at all times is extremely important.
There are many types of gages out there. I have one of the original electronic gages that were out about 10 years ago. It’s a little bigger and has a wire and a probe on the end and was very expensive. 10 years ago it was over $1,000. But with any piece of electronic equipment, they get smaller, better, and less expensive but there are still a few choices
Most gages today will fit in the palm of your hand and in your pocket. But they are not all created equal. The less expensive ones will only measure in MILS. This is Ok if you choose to measure that way, but some are only accurate to one half of one MIL which is not OK for a detailer. These are fine for car auction guys looking for body work on cars and where extreme accuracy is not all that important. They are just looking for very large paint readings which would signify body and paint work has been done. If you purchase a MIL gage only, it needs to be accurate to one tenth of one MIL for use in wet sanding. For me, this is still not a small enough unit of measure. I need the gage to constantly change readings as I sand. Sometimes when measuring in MILS, you can pass over the repair area numerous times without seeing a reading change. This is no good. So I chose not to use a paint gage that will only measure in MILS. The MILS only gages will be cheaper and better than nothing, but there are better ones.
I need a paint gage that will measure in both MILS and Microns. As I said, a micron is a much smaller unit of measure and I need to know where I am in material removal at all times, so this is the tool for me. However, a tool that will measure in both microns and mils is a bit more expensive. The better gages will also measure over both steel and aluminum. The cheaper gages will only measure over steel.
There are still other gages that will measure rubber, and composite materials, but generally these gages are still a bit cost prohibitive.
The bottom line is that a paint thickness gage will help you in wet sanding and make you more money. It also shows a customer that you are a true professional. You will be able to determine if a vehicle has been painted by seeing the varying readings from one panel to the next and the customer sometimes will be amazed that you knew. If you want to do more wet sanding, an electronic paint thickness gage is a tool that you must consider investing in. It will pay for itself and make you money in no time.
Article by Kevin Farrell